Magnetic Door Lock With RFID Access
Purpose
To implement a radio frequency keycard system that can trigger a magentic door lock and be integrated into Home Assistant.
Note
I originally started this project thinking that I could simply mix and match some popular components to create a DIY solution. I spent quite a bit of time designing and 3D Printing enclosures, wiring and soldering, and generally banging my head against the wall. The source of the frustration was the RC522 reader, which just is not powerful enough to reliably read keyfobs and keycards. So, I ditched the the 100% DIY direction and bought the official RFID Relay Board and a Wiegand reader. Problem solved.
Hardware Ingredients
-
ESP-RFID Relay Board (12V for ESP8266 Board) with the following options:
- Full Enclosure and Din Rail mount on the back
- Soldered ESP12F Module
- Screw terminals set and soldered
- Door status sensor
-
A 12V power supply delivering at least 2 Amps
- One USB to MicroUSB cable to connect to your computer / server / etc.
Software
- ESP-RFID. (Required) The code that installs the interface on the board's chip.
- NodeMCU PyFlasher 4.0. (Optiona) This is the tool I use on the MacBook to upload the ESP-RFID *.bin file to the NodeMCU board. You may have to use another tool depending upon your environment.
- LanScan IP Network Scanner. (Optional) This is what I use to take inventory of my network devices. It enables me to scan the network to find newly added devices, like the board we're about to flash. After flashing, your device will be accessible via hostname, so you don't need to know the IP address.
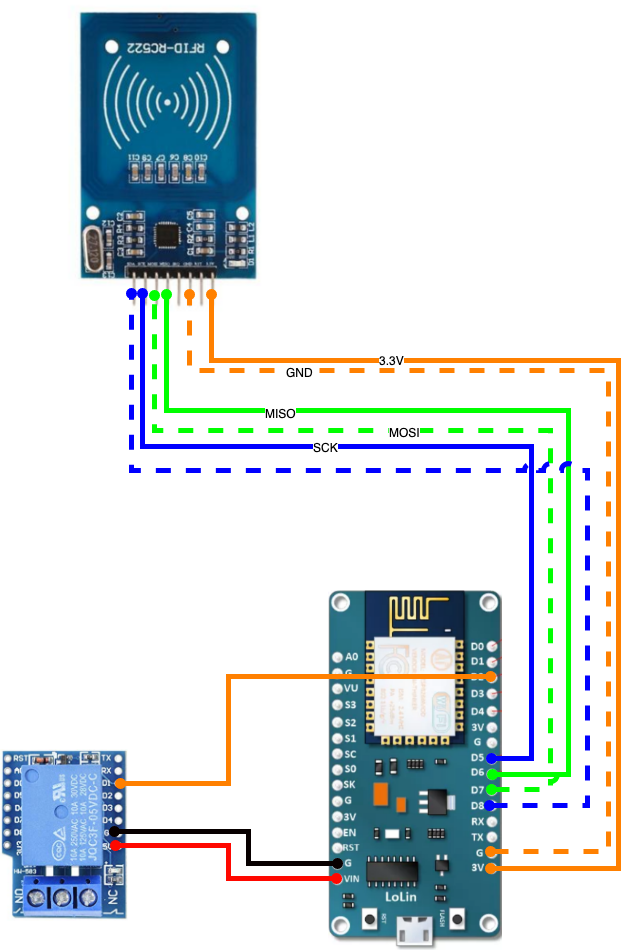
Wiring Diagram
Instructions
Assuming you have the hardware gathered into a nice little pile:
You don't need to wire up your devices just yet. You can, but it's not required. Right now, we're just going to flash the board so it has the web-interface we need to manage the system.
- Start by downloading the ESP-RFID latest release. Unzip it into your favorite folder.
- Open up your favorite flashing tool (I'm on a MacBook Pro, so I needed a good mac version which I found here.) It's called NodeMCU PyFlasher. It's great!
- Plug the USB to MINI-USB cable into your board and your computer.
- Open NodeMCU Py Flasher. You should see a strange looking serial port in the first field at the top. Mine reads
/dev/cu.SLAB_USBtoUART. I don't know why. It doesn't matter. All you need to do is make sure you find thee right one. - Browse to the favorite folder you created in step 1 and choose the file called
generic.bin. - Set your Baud Rate to
115200. Why? No clue. But it works. - Flash mode needs to be set to
Dual I/O (DIO). - Erase flash? Yes.
- Click the
Flash NodeMCUbutton.
If you don't see progress, try a different USB cable. If you still don't see progress, as you plug-in your board, look for an LED to flash, indicating that the board is getting power. If you don't see that, it's possible that you have a defective board. It's happened to me before.
You should see a completion of the flashing process after a few minutes. At this point, you need to re-set or power off and power on the board again.
This is typically when I remove the board from the USB cable and attach it to a 5V Power supply or iPhone / Android 2.5A, 5V wall-charger to fire it back up.
Do this. Then, go to your computer's WIFI settings and look for a suspiciously familiar looking ESP-RFID'ish WIFI network available and connect to it.
Accessing the Web Interface
Now that your board is online (cross your fingers), and you've connected to the WIFI network that it created (clearly it's online if you were able to find this), click the following link: http://esp-rfid.local.
You can also go straight to http://192.168.4.1 which is the default addresss for the board.
Congratulations! Welcome to the web interface! Now, go back up to the wiring diagram on this page and wire up your components so they can be a part of this digital party.
How you setup the web interface is largely up to you.